3D Layer
3D Layer - A single 3D Layer (3D object, particle system, ect)
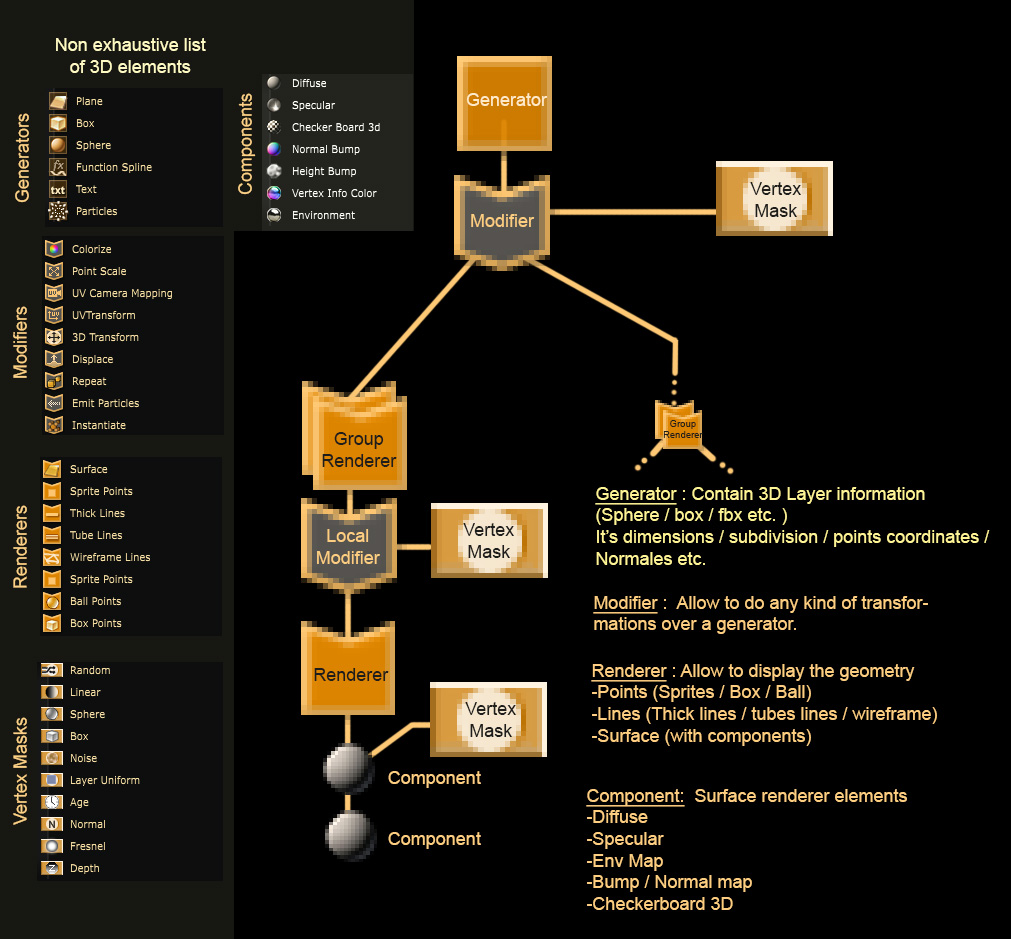
The structure of
 3D Layer
follows the same logic as this of
3D Layer
follows the same logic as this of
 2D Layer
: they
2D Layer
: they
contain a
 2D Generator
, a stack of
2D Generator
, a stack of
 3D Modifier
that can be modulated through
3D Modifier
that can be modulated through
 3D Mask
and
3D Mask
and
 3D Renderer
that can have local modifiers.
3D Renderer
that can have local modifiers.
The main difference is that instead of acting on 2D images, these 3D components operate on geometries .
-
 3D Generator
:
3D Generator
:
The Generator of a 3D layer represents the source of a geometry. It can either be constituted of faces (mesh), points (point cloud, particles), lines (splines) or a combination of those. -
3D Modifier
:
A 3D layer contains a chain of modifiers that are applied to the geometry defined in its generator. A wide number of 3D modifiers are provided ranging simple vertex attribute operations to advanced distortion and generation effects. -
3D Mask
:
Any 3D modifier in Smode can be modulated with 3D masks that define for every vertex (point in space) the level of application of the modifier. Masks enable numerous applications from traditional displacement-masking to advanced modulation of stylisation effects and can even be used for animations. -
3D Renderer
:
Once the generator is modified, it gets rendered by its
3D Renderer
.
By default there is one such renderer, but it’s very easy to turn it into a group renderer to get the layer displayed multiple times (without nearly any additional cost). Renderers in 3D are dispatched in 3 categories consistent with the generators : Lines, points and surface renderers.
Each renderer has an opacity and a blending mode . It is possible to add local modifiers on renderers but for that you’ll have to turn them into groups renderer (select a renderer and Ctrl+Shift+G).
To group several 3D objects, select them and press CTRL+SHIFT+G. This will have different effects if you choose
Light or
3D Placement .
You can also group several 3D layers under a
 Compo
with CTRL+SHIFT+C which will result to create a rasterized layer containing your 3D scenery. This composition will have a depth buffer you can use with a 2D
Compo
with CTRL+SHIFT+C which will result to create a rasterized layer containing your 3D scenery. This composition will have a depth buffer you can use with a 2D
 Depth mask
.
Depth mask
.
Learn more about 3D compositing by reading: Basics of 3D Compositing .